Battery switch on travel trailer function is crucial for managing your RV’s power. Understanding how your battery switch works is key to preventing electrical issues and maximizing your off-grid adventures. This guide will walk you through the different types of switches, their functions, troubleshooting common problems, and essential maintenance tips, ensuring you’re well-equipped to handle any power situation on the road.
We’ll cover everything from the basic operation of a single-pole switch to the more complex configurations found in larger RVs, explaining the advantages and disadvantages of each type. We’ll also explore how the battery switch interacts with other systems in your travel trailer, such as the charging system and various appliances. By the end, you’ll be a battery switch expert!
Function and Purpose of the Battery Switch
The battery switch in your travel trailer is a crucial component of its electrical system, acting as a central control for managing power flow between your various battery banks. It allows you to selectively use and charge different batteries, optimizing power usage and extending battery life. Understanding its function is key to preventing electrical problems and ensuring a safe and enjoyable camping experience.The primary function of the battery switch is to isolate the house batteries (which power your interior lights, appliances, and other 12V systems) from the chassis battery (which powers your engine starting system).
This isolation is essential for several reasons, primarily to prevent draining the chassis battery, which could leave you stranded. With the switch properly set, you can run your house systems independently, using only the power stored in your house batteries. This also protects your vehicle’s starting system from accidental discharge.
Battery Isolation and Independent Operation
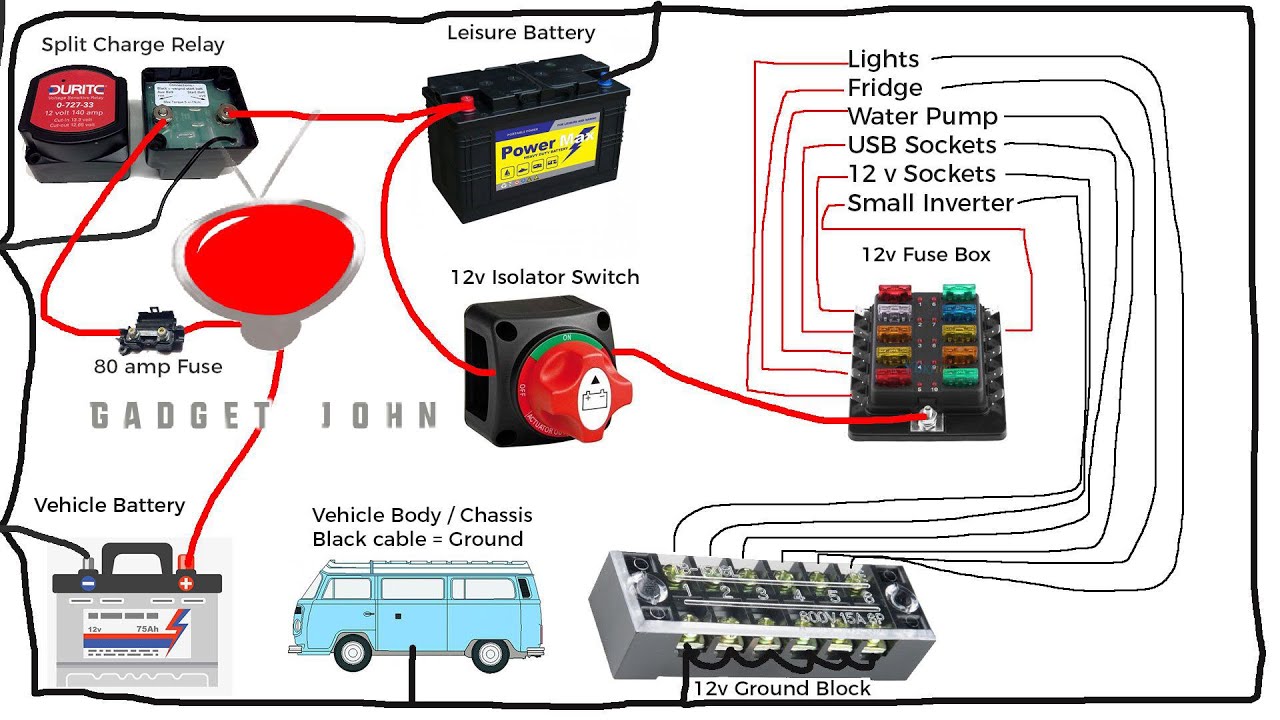
The battery switch achieves isolation by physically disconnecting the electrical circuits connecting the house and chassis batteries. This prevents current from flowing between them, regardless of the charge state of each battery. A common type of switch uses a series of heavy-duty contacts that are either connected or disconnected depending on the switch position. Imagine a three-way switch controlling three different electrical paths; the chassis battery, the house batteries, and a combined “both” position.
Each position allows for independent control, and switching positions ensures only the selected circuits are active. Incorrect wiring could result in unintended connections, potentially leading to a complete discharge of one or both batteries.
Safety Implications of Improper Use or Wiring
Improper use or wiring of the battery switch can have serious safety implications. For instance, accidentally leaving the switch in the “both” position while the trailer is disconnected from shore power or a generator could drain both your house and chassis batteries, leaving you without power for essential functions, including starting your tow vehicle. Similarly, incorrect wiring could lead to short circuits, potentially causing overheating, fire, or even explosion.
Always ensure that the switch is correctly installed and that you understand its operation before using it.
Safe Switching Between Battery Banks
Before switching between battery banks, ensure your trailer is properly grounded. This step is critical for safety. First, turn off all appliances and devices running on the house batteries. Next, locate the battery switch; it’s typically located near the batteries themselves or in a readily accessible compartment. Then, carefully switch to the desired position, ensuring the switch clicks firmly into place.
So, you’re gearing up for that awesome travel trailer adventure? First things first: learn how that battery switch works! Check out this guide on the battery switch on travel trailer function to avoid any dead-battery surprises. Once you’ve got that sorted, remember to secure travel insurance! Protecting your trip with something like Aon travel insurance gives you peace of mind, letting you focus on the fun.
After making the switch, verify the selected battery bank is powering the desired circuits. If you are switching to “both,” be mindful of potential increased drain on the batteries, and ensure adequate charging is available. If you are switching to “off,” remember that all power will be disconnected to the relevant systems. Regularly inspect the switch and its connections for any signs of damage or corrosion.
So, you’re prepping for your awesome travel trailer adventure? First things first: understand your battery switch on travel trailer function – it’s crucial for keeping your lights and appliances running. Once that’s sorted, think about insurance. Getting Aon travel insurance gives you peace of mind knowing you’re covered for unexpected hiccups. This way, you can truly relax and enjoy the open road!
Maintaining the Battery Switch and Related Components
Keeping your travel trailer’s battery switch in good working order is crucial for reliable power. Regular maintenance prevents problems and extends the lifespan of both the switch and your batteries. Neglecting this can lead to corrosion, poor connections, and ultimately, a dead battery when you need it most.Regular maintenance ensures your battery switch operates smoothly and efficiently, preventing unexpected power outages on the road.
A well-maintained system also safeguards your investment by preventing premature damage to both the switch and your batteries.
Battery Switch and Component Maintenance Schedule
A preventative maintenance schedule is key to a long-lasting battery switch. This schedule combines visual inspections with more thorough cleaning and checks. Sticking to this routine will minimize issues and maximize the life of your system.
- Monthly Inspection: Visually check all connections for corrosion, looseness, or damage. Look for any signs of overheating or unusual wear on the switch itself.
- Every Six Months: Clean all battery terminals and switch connections thoroughly (detailed process below). Tighten all connections to ensure a secure fit.
- Annually: Perform a complete inspection, including checking the switch’s internal mechanism for smooth operation. Consider applying a protective coating to terminals to prevent corrosion.
Preventing Corrosion on Battery Terminals and Switch Connections, Battery switch on travel trailer function
Corrosion is the enemy of electrical connections. It increases resistance, leading to reduced power flow and potentially damaging your battery and switch. Preventing corrosion is simple and requires consistent effort.
- Keep Connections Clean: Regularly clean terminals and connections with a wire brush and baking soda solution. This removes accumulated dirt and corrosion.
- Apply Protective Coating: After cleaning, apply a thin layer of dielectric grease or corrosion inhibitor to the terminals and connections. This creates a barrier against moisture and oxidation.
- Ensure Proper Ventilation: Good airflow around the batteries helps prevent moisture buildup, a major contributor to corrosion. Avoid storing items directly on top of the batteries.
Cleaning and Inspecting the Battery Switch
Regular cleaning and inspection are crucial for identifying potential problems early. A simple cleaning routine can prevent costly repairs down the line.To clean the switch, first disconnect the batteries. Use a wire brush to remove any corrosion from the terminals and the switch contacts. Then, use a clean cloth to wipe away any remaining debris. After cleaning, reconnect the batteries and verify that the switch operates correctly.
Inspect the switch mechanism for any signs of damage or binding. If anything seems amiss, consult a professional.
Extending the Lifespan of the Battery Switch
Proper use and maintenance will significantly extend the lifespan of your battery switch. Following these simple tips can prevent premature failure.
- Avoid Overloading: Don’t draw more power than your system is designed to handle. Overloading can cause overheating and damage the switch.
- Use Correct Gauges: Ensure all wiring is the correct gauge for the amperage being used. Improper gauge wiring can overheat and damage the switch.
- Regular Inspections: As mentioned previously, regular inspections are vital for early detection of any problems. Addressing small issues promptly can prevent them from becoming major problems.
Mastering your travel trailer’s battery switch is about more than just flipping a switch; it’s about understanding your RV’s electrical system and ensuring safe and reliable power. From choosing the right switch for your needs to performing regular maintenance, this guide provides the knowledge you need for smooth sailing on all your camping trips. Remember to always prioritize safety when working with electrical systems, and don’t hesitate to consult a professional if you encounter any problems you can’t solve.
Popular Questions: Battery Switch On Travel Trailer Function
What happens if I leave my battery switch on all the time?
Leaving your battery switch on constantly can drain your batteries, especially if you have parasitic draws (devices consuming power even when turned off). It’s best practice to turn it off when not using the trailer for extended periods.
How do I know if my battery switch is bad?
Symptoms of a bad battery switch include no power to the house batteries, flickering lights, or blown fuses. Inspect the switch for corrosion, loose connections, or physical damage.
Can I install a battery switch myself?
While possible, installing a battery switch requires electrical knowledge and working with potentially dangerous voltages. If you’re unsure, it’s best to consult a qualified RV technician.
What type of battery switch is best for my travel trailer?
The best type depends on your setup (single or dual batteries). A double-pole, double-throw switch is common for dual battery systems, allowing for separate control and isolation.
